By Matt Fussell
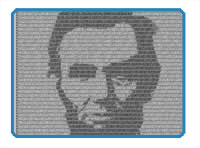
Micrography is an ancient art making technique that is Middle Eastern in it's origin. Micrography is the process of creating imagery through words or text- a text image. Micrography can be created through a variety of media. Pen and ink and graphite are commonly used. By adjusting the value of ink or graphite, an image can appear through the text. If using line, adjusting the line quality can create the illusion of a change in value.
Micrography is very easily created in Adobe Photoshop CS4. Take whatever image you want to convert into text and bring it into Adobe Photoshop CS4. Duplicate the layer. Then go to image->adjustments->threshold. Slide the bar to adjust the threshold effect. Create a new layer and type your text in black in a small font size. Be sure to cover the entire document with black text. Rasterize the type by going to layer->rasterize->type. Go to the threshold layer. Select the white areas with the magic wand tool. (Be sure that the contiguous box is unchecked) Go to the black text layer and erase everything. Only the black text in the white areas will be erased.
Now you just need to repeat these steps with white text. But, before you do this, add a layer that is gray by creating a new layer. Go to select->all. Use the paintbucket to fill in the background gray. Move this layer behind the black text layer but on top of the threshold layer. Create a new layer on top of the gray layer and type with white text to cover the entire document. Rasterize the type. Go to the threshold layer. This time, select the black areas with the magic wand tool. Go to your white text layer and erase everything. Now you have an image made up of text.
The following video shows you how to create Micrography in Adobe Photoshop CS4...
Here are some more art lessons that you may like...