By Matt Fussell
Roses are popular subjects for drawings and paintings. It seems logical to me to put together a tutorial on how to draw roses with my one of my favorite media, colored pencils.
Roses can be complex to draw. This is because the petals are organic in shape and overlap each other. The shape of the flowering part of a rose can create a variety of shadows and highlights. Depending on the view of the flower, it can also create foreshortening of the petals.
All of this complexity can lead to the misconception that roses are hard to draw. This is not the case, however, when we break down each step of the drawing down into "steps of observation". Remember, drawing is really mostly about observation anyway.
These are the steps that I go through when observing and drawing a difficult subject like a rose. Going through these steps when you draw anything complex will help you break the complexity down and make the subject easier to draw.
Begin by simplifying your object (in this case, a rose) into the contour lines or outlines that you see. Try to block out all the other information that could distract you from just the contour lines. Don't even look at the shadows and highlights at this point. Also, totally ignore color. Just concentrate on the contour lines, we'll handle the value and color at a later stage in the drawing. (Remember, this method is for complex, difficult to draw subjects.)
Once you have your contour lines defined, you can start to add the shadowed areas. Concentrate only on the darker values here. This step is similar to creating an under painting. Be careful to not get too dark too quickly. It's always easier to make an area darker than it is to make an area lighter after you've made it too dark.
Now that the contour lines and the darker values have been defined, it's time to concentrate on the local color. Local color is the color that actually exists on the subject that you are drawing. In this case it is a rose, so the local color is red. Add the color right over the top of the darker "under painting" allowing the colors to mix and layer. You'll notice that the colored pencils are becoming creamier. This is what we are after.
The last step is to pay attention to the highlights and shadows. In this stage, you'll want to "push and pull" the lighter and darker values. This will create contrast that will lead to the illusion of form. Since we are talking roses, each petal will have its own range from light to dark. You can burnish the finished surface of colored pencil by layering with the local color (red) over the highlighted and shadowed areas.
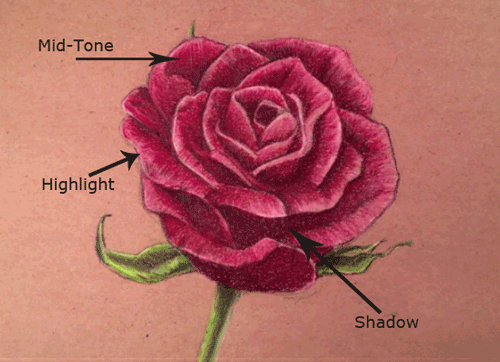
Here's a look at the highlights, shadows, and mid-tones in the finished drawing...

Notice that each petal has a near complete range of value.
Here's how to draw a rose with colored pencils...
Here are some more art lessons that you may like...